
31 Winter Crafts for Adults to Make and Sell for Extra Holiday Cash
Winter has a way of slowing everything down. The days feel shorter, the air sharper, and most of us spend more time tucked inside. It becomes a season for blankets, candlelight, and small creative projects that make the cold feel softer.
If you have been wanting a simple way to bring in extra money or use up the supplies you already have, winter is a good time to start. Handmade items tend to do well this time of year because people want cozy, thoughtful gifts that feel personal.
This list gathers winter crafts for adults to make and sell without complicated tools or expensive materials. Everything here can be made in small batches and feels warm and handmade, which is exactly what people look for during the colder months.
Candle & Wax Crafts
There’s nothing cozier than a candle glowing on a cold night. These wax crafts are simple, soothing to make, and always in demand through winter.
1. Soy Candles in Thrifted Mugs
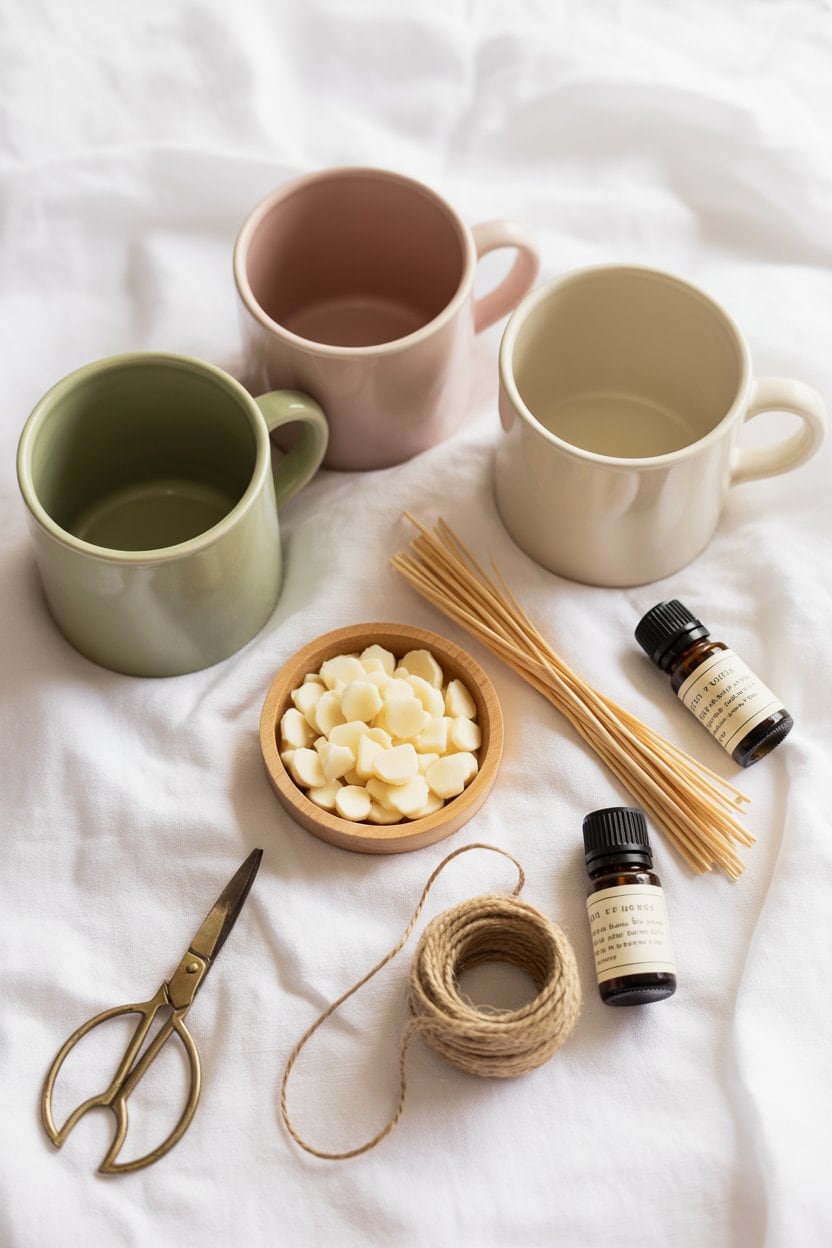
Soy candles are a classic winter craft that never loses its charm.
Thrifted mugs make great containers and give each candle a cozy, one-of-a-kind look. Choose ceramic or stoneware mugs without cracks or chips.
Melt soy wax, add your favorite scent, and pour it carefully into each mug with a wick in place. Let them cool before trimming.
Vanilla, pine, and cinnamon are timeless winter scents that sell well. Add a simple tag or twine tie for an easy handmade finish.
How to Make It
- Set your mugs on a flat, heat safe workspace.
- Melt soy wax flakes in a double boiler until fully liquid.
- Add a few drops of fragrance oil and stir gently.
- Center a wick in each mug and secure it.
- Pour the melted wax into the mug and leave it to cool.
- Trim the wick once the candle is fully set.
Shopping List
- Soy Wax Flakes
- Cotton Candle Wicks
- Candle Fragrance Oils
- Wick Centering Tools
- Pouring Pitcher for Wax
Tips to Make It Go Smoothly
- Keep the wick centered so the candle burns evenly.
- Let the wax cool at room temperature for a smooth finish.
- Warm the mug slightly before pouring for fewer imperfections.
- Check for small cracks in the mug before you start.
- Avoid pouring wax that feels too hot because it can cause frosting.
- Give the candle time to set without moving it.
2. Botanical Wax Sachets
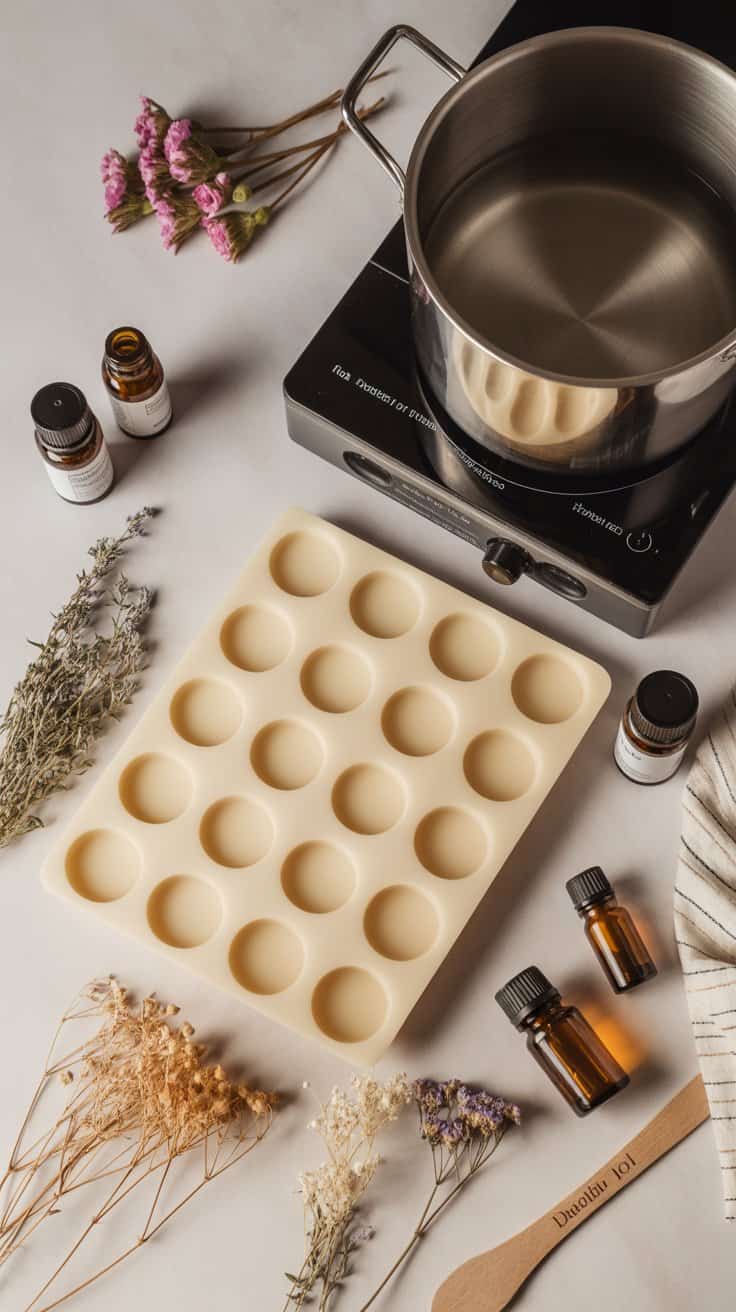
Botanical wax sachets look beautiful and smell amazing, which makes them an easy win for winter markets or online shops.
Melt soy or beeswax, stir in a few drops of essential oil, and pour into silicone molds. Before the wax cools, add dried flowers, herbs, or pine sprigs for a natural look.
Once they harden, pop them out and thread twine through a small hole for hanging.
They’re low-cost to make, lightweight to ship, and a lovely alternative to candles for anyone who prefers flameless fragrance.
How to Make It
- Melt soy or beeswax in a double boiler.
- Add a few drops of essential oil once the wax is liquid.
- Pour into silicone molds or small tins.
- Sprinkle dried flowers or herbs on top.
- Let them cool completely before removing from the mold.
- Add a loop of twine if you want them to hang.
Shopping List
Tips to Make It Go Smoothly
- Use molds with smooth surfaces so the sachets release easily.
- Add botanicals gently so they sit on top instead of sinking.
- Keep scents soft and simple for wider appeal.
- Let the wax cool fully to avoid cracks when removing.
- Store finished sachets out of direct sunlight to protect the color.
3. Cinnamon or Vanilla Tealights
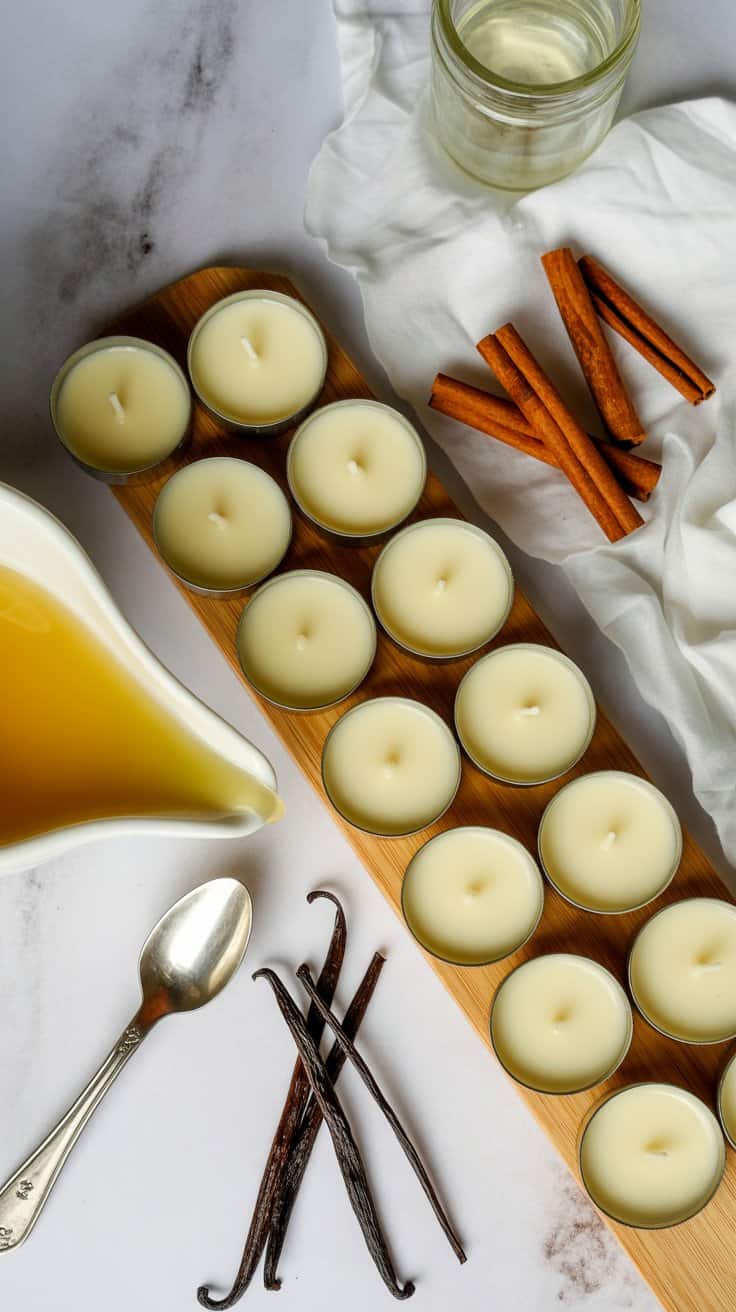
Tealights are quick to make and ideal for selling in sets.
Use soy or beeswax and pour into small metal or glass cups. Add a few drops of cinnamon, vanilla, or clove essential oil for a cozy scent.
Bundle them in groups of four or six with a paper sleeve or small box. They make simple, affordable gifts that always sell well during the holidays.
How to Make It
- Melt soy or beeswax in a double boiler.
- Stir in a few drops of vanilla, cinnamon, or clove fragrance.
- Place wicks into tealight cups.
- Pour the melted wax slowly into each cup.
- Let them cool without touching or moving them.
- Trim the wicks before packaging.
Shopping List
Tips to Make It Go Smoothly
- Keep the pour slow to avoid air bubbles.
- Use heat safe cups that hold shape as the wax cools.
- Choose fragrances that match the season for easier sales.
- Package tealights in sets of four or six to increase value.
- Let them cure for a day before burning or gifting.
4. Minimalist Candle Tins
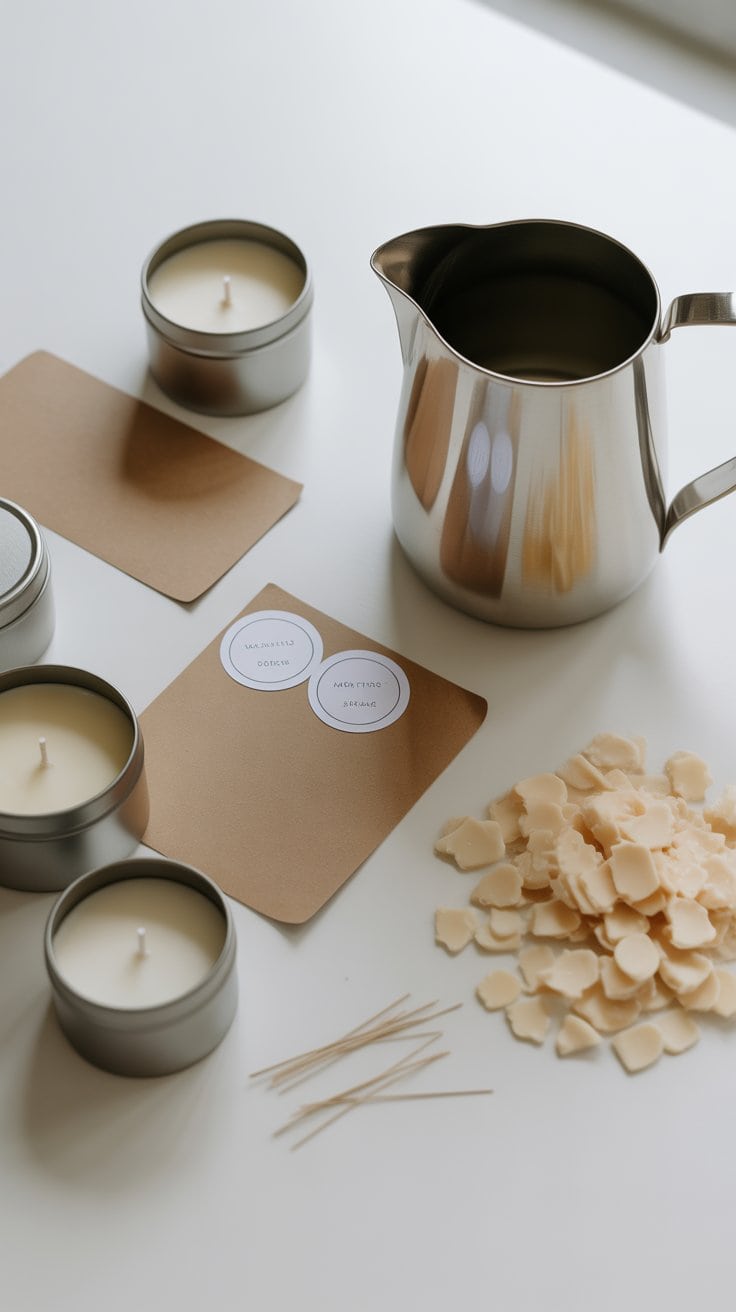
Candle tins have a clean, modern look that appeals to almost everyone.
Choose tins in neutral colors and create simple labels for a polished touch. Stick with two or three signature scents so your shop feels consistent.
They’re sturdy for shipping, easy to batch-make, and great for anyone starting small with candle crafts.
How to Make It
- Set your tins on a flat, heat safe surface.
- Melt soy wax flakes in a double boiler until fully liquid.
- Add your preferred fragrance oil and stir gently.
- Attach wicks to the bottom of each tin.
- Pour the wax slowly into the tins.
- Let them cool before trimming the wicks and adding labels.
Shopping List
Tips to Make It Go Smoothly
- Stick with two or three scents to keep your product line focused.
- Use simple labels for a clean look that matches the style.
- Keep your pour steady to avoid uneven surfaces.
- Let candles cure for a day before packaging.
- Store finished tins in a cool place to protect the scent.
Paper & Printables
Paper crafts are light, affordable, and easy to personalize. They’re also great for digital sellers who want low-cost products with high visual appeal.
5. Printable Wall Art
Printable art sells all year, but does especially well during the holidays. Create seasonal quotes, minimalist illustrations, or soft winter landscapes.
Offer multiple sizes for easy framing and include clear printing instructions for buyers.
These are quick to design and can become a steady source of passive income.
How to Make It
- Create your design in Canva, Procreate, or another art program.
- Export it in high resolution and offer multiple sizes.
- Save each size separately so buyers can print at home or through a shop.
- Upload to your shop with a clean preview image.
- Add a simple list of printing instructions for your customers.
Shopping List
- Canva or Procreate
- Printable Art Templates
- Mockup Backgrounds
- Font Sets
- Digital Storage or Cloud Backup
Tips to Make It Go Smoothly
- Stick with clean, readable fonts to keep the look polished.
- Offer neutral versions so the art fits many home styles.
- Use warm lighting in your mockups to create a cozy feeling.
- Keep file names clear so buyers know which size is which.
- Add a short usage note so buyers understand how to print.
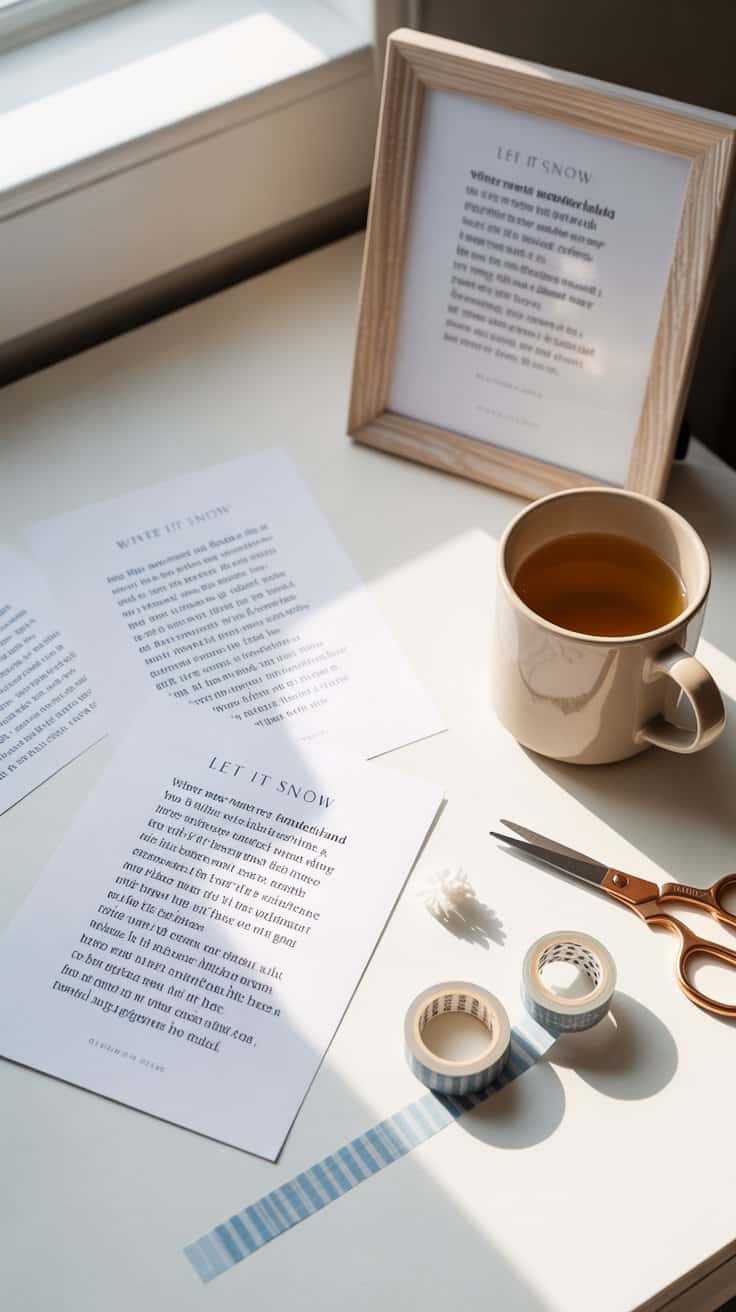
6. Hand-Drawn Greeting Cards
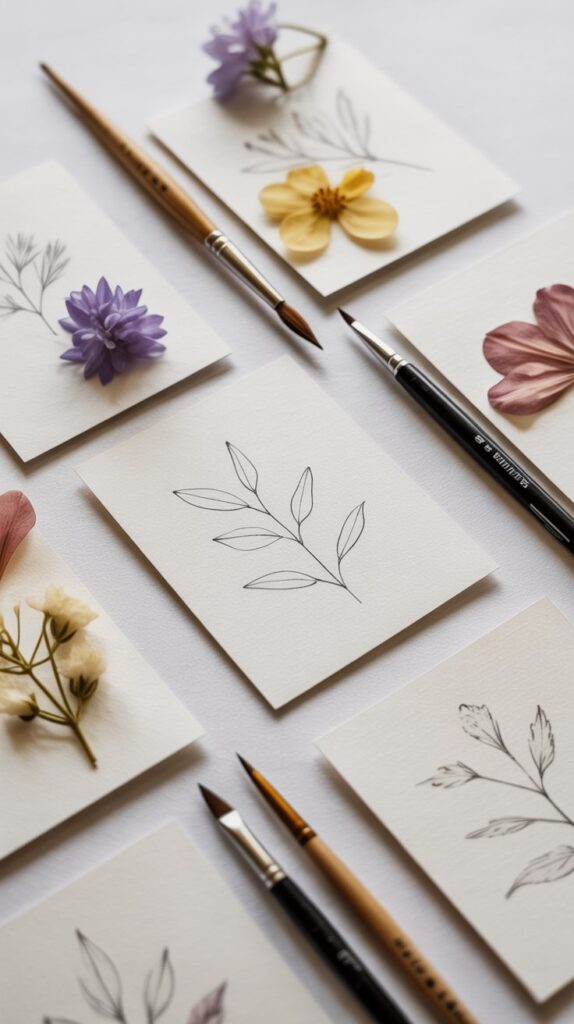
Handmade cards always feel personal. Start with blank cardstock and simple line drawings, pressed flowers, or watercolor details.
Bundle them in sets and tie with twine or a small ribbon for a cozy finish.
Cards are affordable, easy to mail, and perfect for shoppers who love sending handwritten notes.
How to Make It
- Start with blank cardstock cut to your preferred size.
- Draw or paint simple designs like winter branches, stars, or cozy mugs.
- Add a short phrase or leave the design minimal.
- Let everything dry before folding the card.
- Pair with envelopes and bundle in small sets.
Shopping List
- Cardstock
- Envelopes
- Fine Line Pens or Watercolor Paints
- Pressed Flowers
- Card Sleeves or Cellophane Bags
Tips to Make It Go Smoothly
- Keep designs simple so you can batch them easily.
- Work in soft winter colors that fit many occasions.
- Use thicker pens or paints sparingly to prevent warping.
- Bundle cards in sets of four for easy gifting.
- Photograph cards on neutral backgrounds for clarity.
7. Pressed Flower Bookmarks
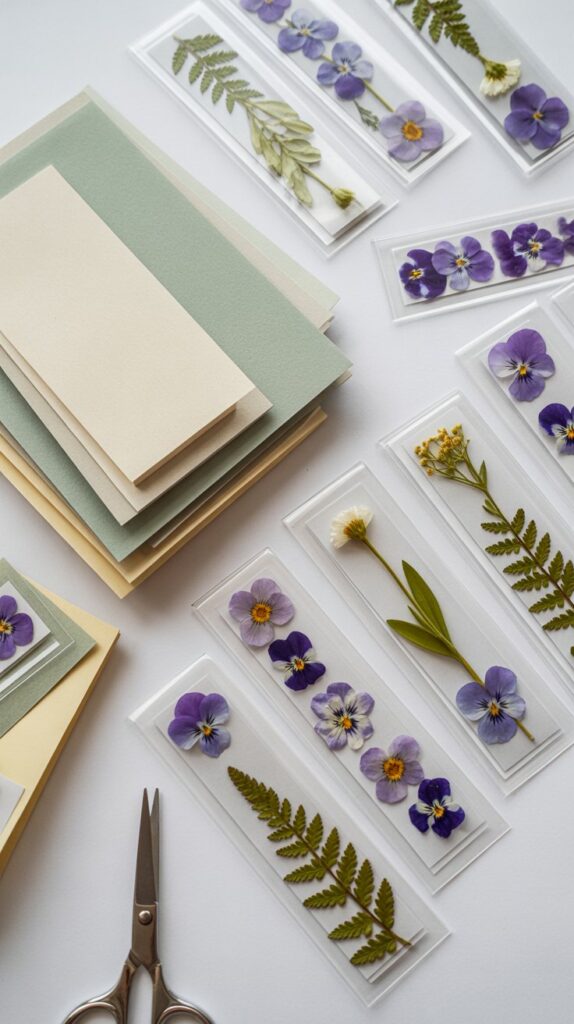
Pressed flower bookmarks are delicate, inexpensive, and quick to make. Use recycled paper and real dried petals for a natural, winter-inspired look.
Laminate them for durability or leave them textured for a rustic finish.
They make great low-cost add-ons for markets or Etsy shops.
How to Make It
- Press flowers between heavy books or use a flower press.
- Cut bookmark shapes from sturdy paper.
- Arrange the dried petals on the paper.
- Seal with laminate sheets or leave uncovered for a rustic feel.
- Punch a small hole and add a ribbon if you want a softer look.
Shopping List
- Dried or Pressed Flowers
- Cardstock
- Laminating Sheets
- Hole Punch
- Ribbon or Twine
Tips to Make It Go Smoothly
- Choose flat flowers so the bookmark stays smooth.
- Keep layouts simple to avoid clutter.
- Laminate slowly to avoid wrinkles or trapped air.
- Use soft, neutral ribbons for a calm winter feel.
- Package bookmarks in sets for higher value.
8. DIY Notepad Sets

Cut recycled paper into small stacks and bind them at the top with glue or a binder clip. Add a printed cover or decorative backing for extra charm.
Notepads are practical, easy to package, and can be sold in small sets for gifts or stocking stuffers.
How to Make It
- Cut paper into small, even stacks.
- Align the edges and secure them with binder clips.
- Brush a thin layer of PVA glue along the top edge.
- Let it dry and add a second layer if needed.
- Attach a simple cover or backing for stability.
Shopping List
- Paper or Recycled Paper Scraps
- PVA Glue
- Binder Clips
- Cardstock for Covers
- Paper Cutter
Tips to Make It Go Smoothly
- Keep cuts clean so the notepad binds neatly.
- Use a thin layer of glue to prevent clumping.
- Add a decorative cover for a finished look.
- Create sets of two or three for gifting.
- Photograph them with pens and soft lighting for a cozy appeal.
9. Knit or Crochet Mug Cozies
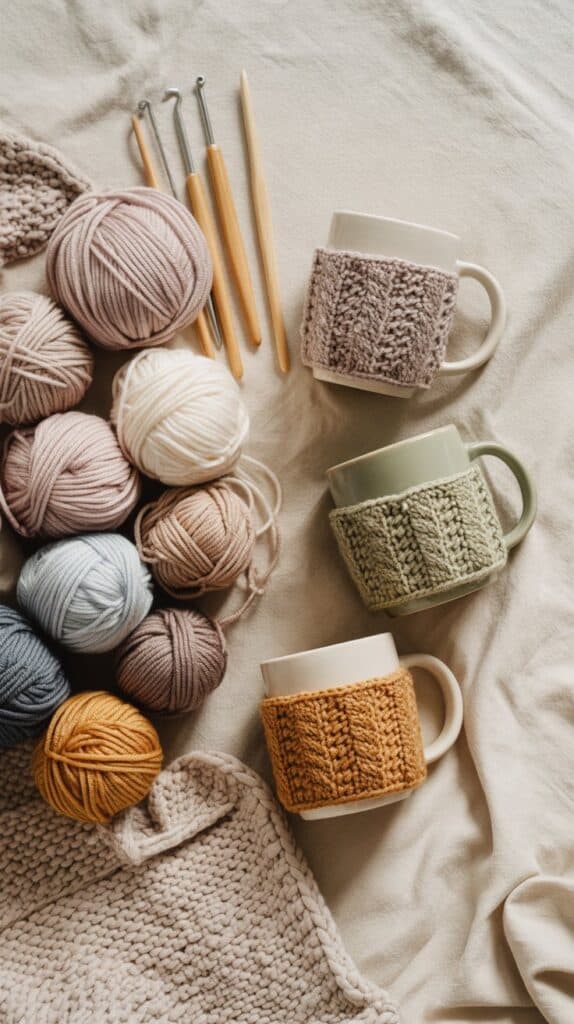
Mug cozies are quick to make and a great way to use up leftover yarn. Stick with soft neutrals, simple stitches, and textures that feel cozy to hold.
Wrap them around thrifted mugs or package them in small sets with tea bags for a thoughtful gift idea.
They are lightweight, easy to batch-make, and photograph beautifully for online listings.
How to Make It
- Choose a soft yarn that feels good in your hands.
- Knit or crochet a rectangle long enough to wrap around a mug.
- Add a button loop or sew the ends together.
- Test it on a mug to check the fit.
- Package with a ribbon or add a tea bag for gifting.
Shopping List
- Soft Yarn
- Crochet Hooks or Knitting Needles
- Buttons
- Yarn Needle
- Mugs for Sizing
Tips to Make It Go Smoothly
- Stick with simple stitches that work for many styles.
- Choose neutral or winter colors for easy selling.
- Warm up your cozy with a steam block if it looks uneven.
- Keep your sizing a little stretchy so it fits different mugs.
- Pair the cozy with a mug in your photos for clarity.
10. Fleece Hand Warmers
Fleece hand warmers are simple, practical, and always sell well at winter markets. Cut small squares of fleece or flannel, fill them with uncooked rice, and sew around the edges.
They are reusable and easy to heat in the microwave for quick warmth on cold mornings.
Tie them in pairs with twine or stack a few in a small cloth bag for a neat, handmade set.
How to Make It
- Cut two small squares of fleece or flannel for each warmer.
- Place right sides together and sew three edges.
- Fill with uncooked rice or flaxseed.
- Sew the final edge closed.
- Pair them and package in a simple cloth bag.
Shopping List
- Fleece or Flannel Fabric
- Rice or Flaxseed
- Sewing Machine or Needle and Thread
- Fabric Scissors
- Small Cloth Bags
Tips to Make It Go Smoothly
- Cut pieces the same size so the warmers stay even.
- Fill lightly so they shape well in the hand.
- Close the final seam neatly so nothing spills.
- Test one in the microwave to check heating time.
- Offer care instructions with each set.
11. Fabric Scrap Garlands
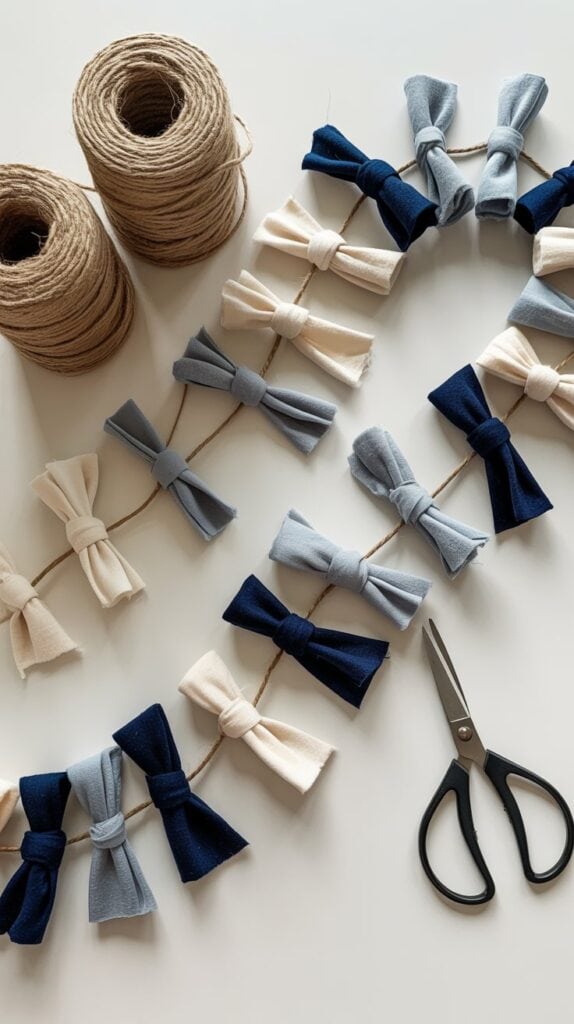
Garlands are a lovely way to use up leftover fabric. Cut or tear strips and tie them onto twine for a soft, rustic look.
Mix plaids, creams, or faded pastels for a calm winter palette.
They are light, easy to ship, and perfect for anyone decorating with a cozy or cottagecore style.
How to Make It
- Cut or tear fabric strips into even lengths.
- Tie each strip onto twine or string.
- Repeat until the garland looks full.
- Trim any uneven ends.
- Wrap neatly for packaging or display.
Shopping List
- Fabric Scraps
- Twine or String
- Fabric Scissors
- Measuring Tape
- Storage or Gift Bags
Tips to Make It Go Smoothly
- Mix textures for a cozy, layered look.
- Keep strips similar in size for a clean finish.
- Use soft winter colors like cream, grey, or muted plaid.
- Tie knots gently to avoid stretching the fabric.
- Photograph garlands hanging so buyers see the full effect.
12. Embroidered Ornaments
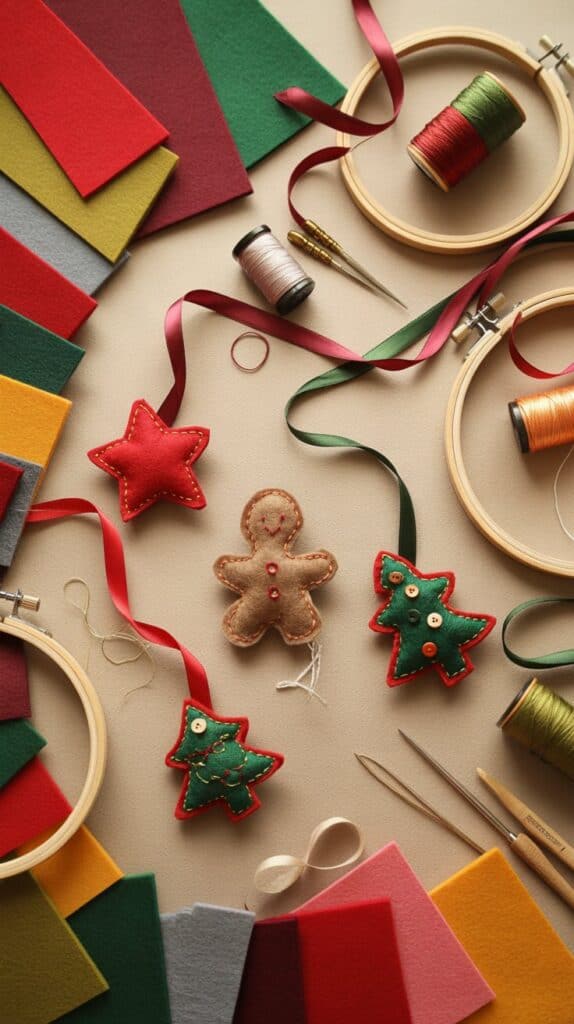
Embroidered ornaments are personal, timeless, and easy to customize. Use felt, linen, or cotton and keep the designs simple. Snowflakes, stars, and initials always work.
Sew a small loop of ribbon at the top and package them in sets of three for gift-ready bundles.
They sell well because they feel nostalgic and handmade without taking hours to create.
How to Make It
- Cut felt or linen into ornament shapes.
- Embroider simple designs like snowflakes or initials.
- Add a backing piece and sew around the edges.
- Stuff lightly if you want more dimension.
- Add a ribbon loop for hanging.
Shopping List
- Felt or Linen Fabric
- Embroidery Thread
- Embroidery Needle
- Ribbon
- Stuffing (Optional)
Tips to Make It Go Smoothly
- Keep designs simple so the ornaments stay clean and readable.
- Use soft winter colors that blend well with holiday décor.
- Trim edges neatly for a polished look.
- Add initials or dates for easy personalization.
- Package ornaments in sets of three for a higher value.
Nature & Rustic Crafts
Natural materials are affordable, beautiful, and easy to find. These rustic projects celebrate the quieter side of winter and appeal to anyone who loves simple, earthy décor.
13. Dried Orange Garlands
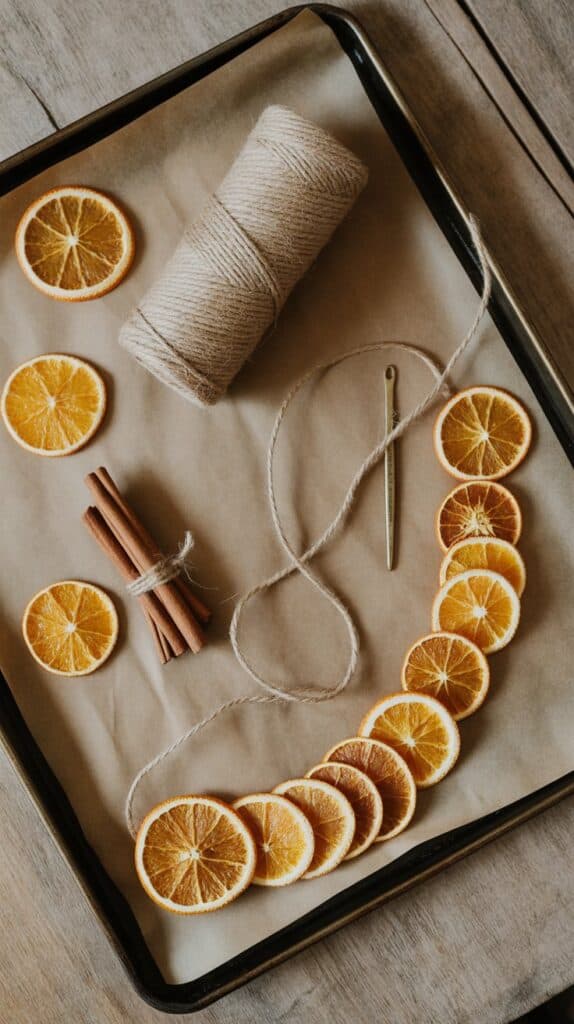
Dried orange garlands bring a soft, natural glow to winter spaces. Slice oranges thinly, bake at a low temperature until dry, and thread them onto twine.
Add cinnamon sticks or wooden beads between slices for texture.
They look lovely on mantels, windows, or Christmas trees and sell well at winter markets.
How to Make It
- Slice oranges thinly and pat them dry.
- Bake at a low temperature until they are fully dehydrated.
- Let the slices cool before handling.
- Thread each slice onto twine with a needle.
- Add cinnamon sticks or wooden beads for extra texture.
Shopping List
- Fresh Oranges
- Twine
- Large Needle
- Wooden Beads (Optional)
- Baking Trays and Parchment Paper
Tips to Make It Go Smoothly
- Keep slices thin so they dry evenly.
- Bake low and slow to avoid burning the edges.
- Thread gently to prevent tearing.
- Mix sizes and shapes for a fuller look.
- Store garlands flat so they do not warp.
14. Pinecone Fire Starters

Pinecone fire starters are cozy, useful, and fun to make. Collect clean, dry pinecones and dip them in melted wax.
Add a drop of essential oil or sprinkle dried herbs for a natural scent.
Wrap each one in kraft paper with twine and label it as a fire starter. They make practical gifts that feel handmade and warm.
How to Make It
- Clean and dry pinecones before starting.
- Melt beeswax or soy wax in a double boiler.
- Dip each pinecone until coated.
- Set them on parchment paper to cool.
- Wrap with twine or kraft paper for gifting.
Shopping List
- Pinecones
- Beeswax or Soy Wax
- Twine
- Parchment Paper
- Small Gift Bags
Tips to Make It Go Smoothly
- Use dry pinecones so the wax sticks well.
- Dip once for a natural look or twice for a stronger burn.
- Add dried herbs for a light scent.
- Let them cool fully before packaging.
- Label as fire starters so buyers know how to use them.
15. Twig or Wooden Bead Ornaments
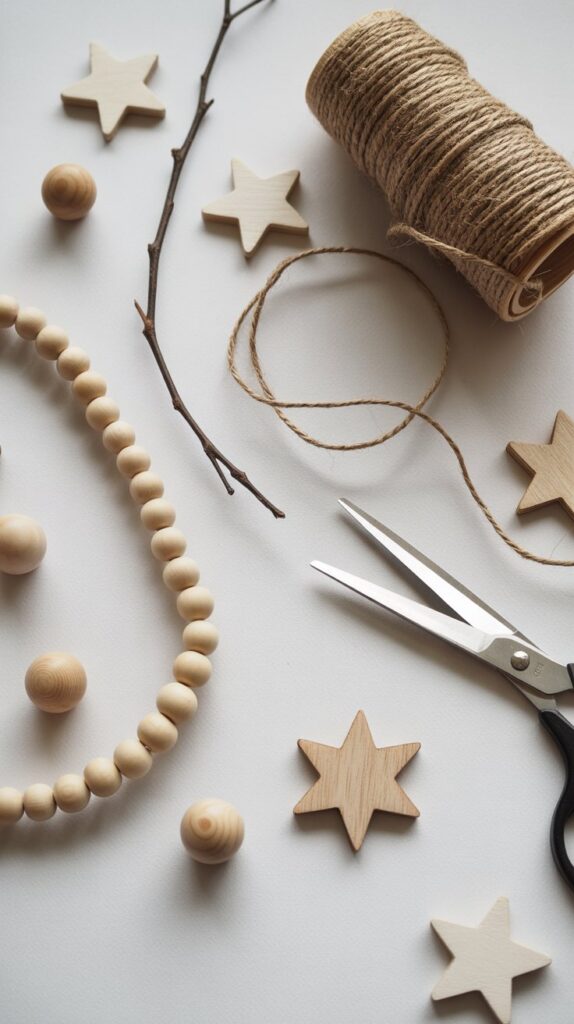
Simple wooden bead ornaments are easy to make and fit any décor style. Thread beads onto string, tie them into small shapes, and add a sprig of greenery.
Twigs work too. Arrange them into stars or trees and tie with thin cord.
They are lightweight, affordable to make, and always popular for rustic holiday decorating.
How to Make It
- Gather small twigs or wooden beads.
- Cut twigs into even pieces or thread beads onto twine.
- Shape into stars, trees, or simple hanging shapes.
- Tie off the ends securely.
- Add a loop of string for hanging.
Shopping List
- Twigs or Wooden Beads
- Twine or String
- Hot Glue Gun (Optional)
- Scissors
- Ribbon for Hanging
Tips to Make It Go Smoothly
- Keep shapes simple so they hold together well.
- Mix natural tones for a warm winter look.
- Use twigs that are dry and sturdy.
- Add one small accent like a bead or bow for interest.
- Group ornaments in sets to increase value.
16. Recycled Jar Lanterns

Glass jars make beautiful lanterns when given a little care. Coat the inside with white paint for a frosted look or wrap the outside with lace or twine.
Place a tealight or small LED candle inside for a gentle glow.
These are perfect for night markets or as part of a cozy winter gift set.
How to Make It
- Clean and dry your jars fully.
- Paint the inside with a thin coat of white for a frosted look.
- Add lace, twine, or simple embellishments to the outside.
- Place a tealight or LED candle inside.
- Test the glow and adjust the paint or décor if needed.
Shopping List
- Recycled Glass Jars
- White Craft Paint
- Lace or Twine
- Tealights or LED Candles
- Paintbrushes
Tips to Make It Go Smoothly
- Use thin paint layers to let the light shine through.
- Keep decorations simple to avoid crowding the jar.
- Mix jar sizes for a cozy set.
- Use LED candles for safer gifting.
- Photograph lanterns lit to show the warm glow.
Bath & Body Gifts
Handmade bath products feel luxurious without being complicated to make. These small self-care items are perfect for gifting, packaging in sets, or selling at local markets.
17. Sugar Scrubs in Glass Jars
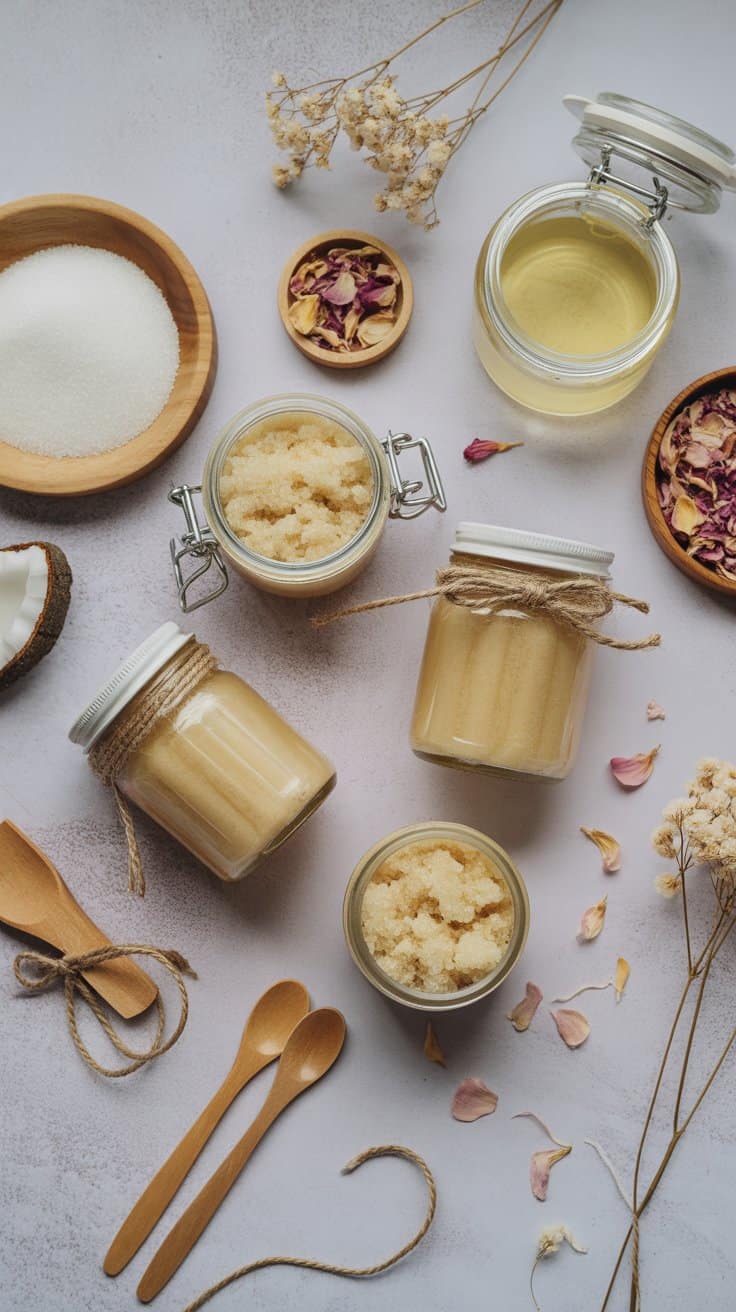
Sugar scrubs are quick to mix and look lovely in simple jars. Combine sugar, coconut oil, and a few drops of essential oil for scent.
Try vanilla, orange, or peppermint for winter. Add a sprinkle of dried herbs or flower petals for texture.
Label each jar with a simple sticker or tag and remind buyers to stir before using.
How to Make It
- Mix sugar with melted coconut oil until it forms a soft paste.
- Add a few drops of essential oil for scent.
- Stir in dried herbs or petals if you want extra texture.
- Spoon the mixture into clean glass jars.
- Add a simple label with the scent and care instructions.
Shopping List
- Sugar
- Coconut Oil
- Essential Oils
- Dried Flowers or Herbs
- Glass Jars
Tips to Make It Go Smoothly
- Adjust the oil if the scrub feels too dry or too oily.
- Use soft scents like vanilla or orange for winter.
- Make small batches so the ingredients stay fresh.
- Wipe jar rims clean before adding lids.
- Store in a cool place to keep the oils stable.
18. Natural Lip Balm Sets
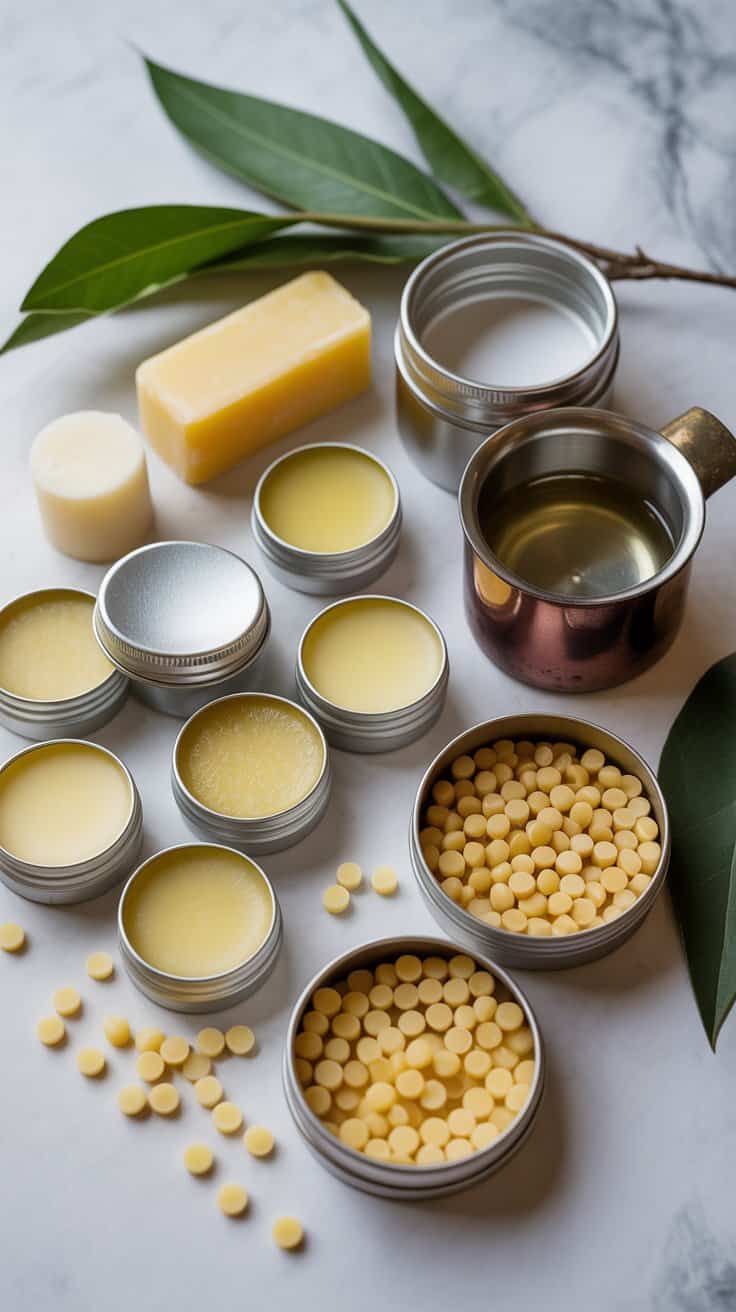
Homemade lip balms are practical and always in demand during cold weather. Melt beeswax, shea butter, and a carrier oil together, then pour into small tins or tubes.
A few drops of peppermint or vanilla extract give them a cozy scent.
Bundle three or four together with twine for a sweet, handmade set.
How to Make It
- Melt beeswax, shea butter, and a carrier oil together.
- Add a drop of peppermint or vanilla extract.
- Stir until smooth.
- Pour into small tins or tubes.
- Let them cool completely before adding lids.
Shopping List
- Beeswax Pellets
- Shea Butter
- Carrier Oil
- Lip Balm Tins or Tubes
- Peppermint or Vanilla Extract
Tips to Make It Go Smoothly
- Test a small batch to get the texture you prefer.
- Keep scents gentle so they appeal to many people.
- Pour slowly to avoid air pockets.
- Label each tin clearly with scent and ingredients.
- Store finished balms away from heat so they stay firm.
19. Herbal Bath Tea Sachets
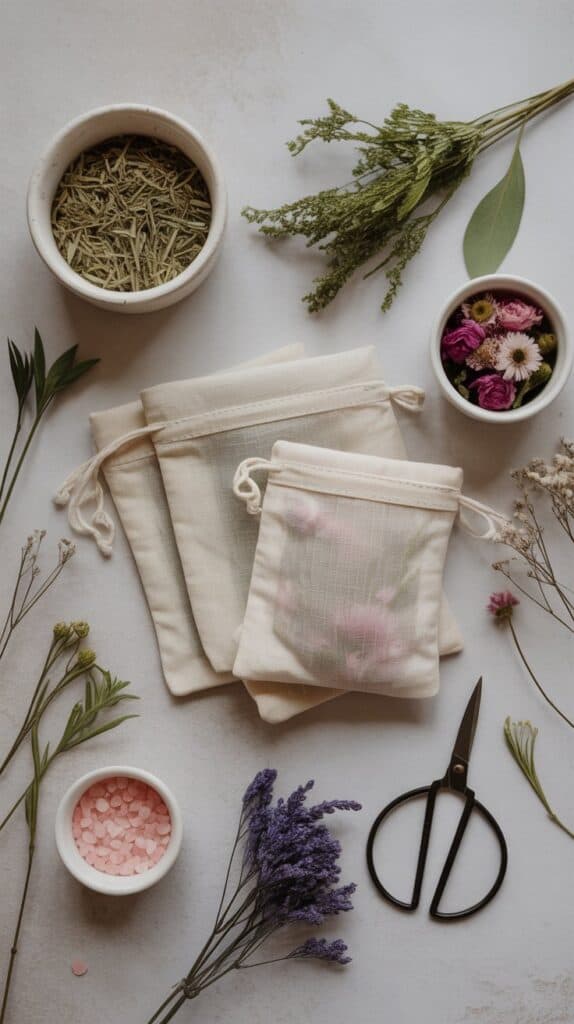
Bath tea sachets are simple to make and smell wonderful. Fill small muslin bags with dried herbs, flowers, and Epsom salts.
Chamomile, lavender, and rose are calming choices for winter baths.
They feel indulgent but only take a few minutes to prepare, making them ideal for markets or gift boxes.
How to Make It
- Fill small muslin bags with dried herbs and Epsom salt.
- Add a few drops of essential oil if you want added scent.
- Tie the bags securely.
- Make sets of two or three for gifting.
- Add a simple tag with soaking instructions.
Shopping List
- Muslin Bags
- Dried Herbs
- Epsom Salt
- Essential Oils
- Twine for Tags
Tips to Make It Go Smoothly
- Choose herbs that keep their color and scent.
- Mix dried florals with salts for a balanced texture.
- Do not overfill the bags so the water can circulate.
- Keep instructions simple and easy to read.
- Store sachets in a cool, dry place.
20. Hand Lotion Bars
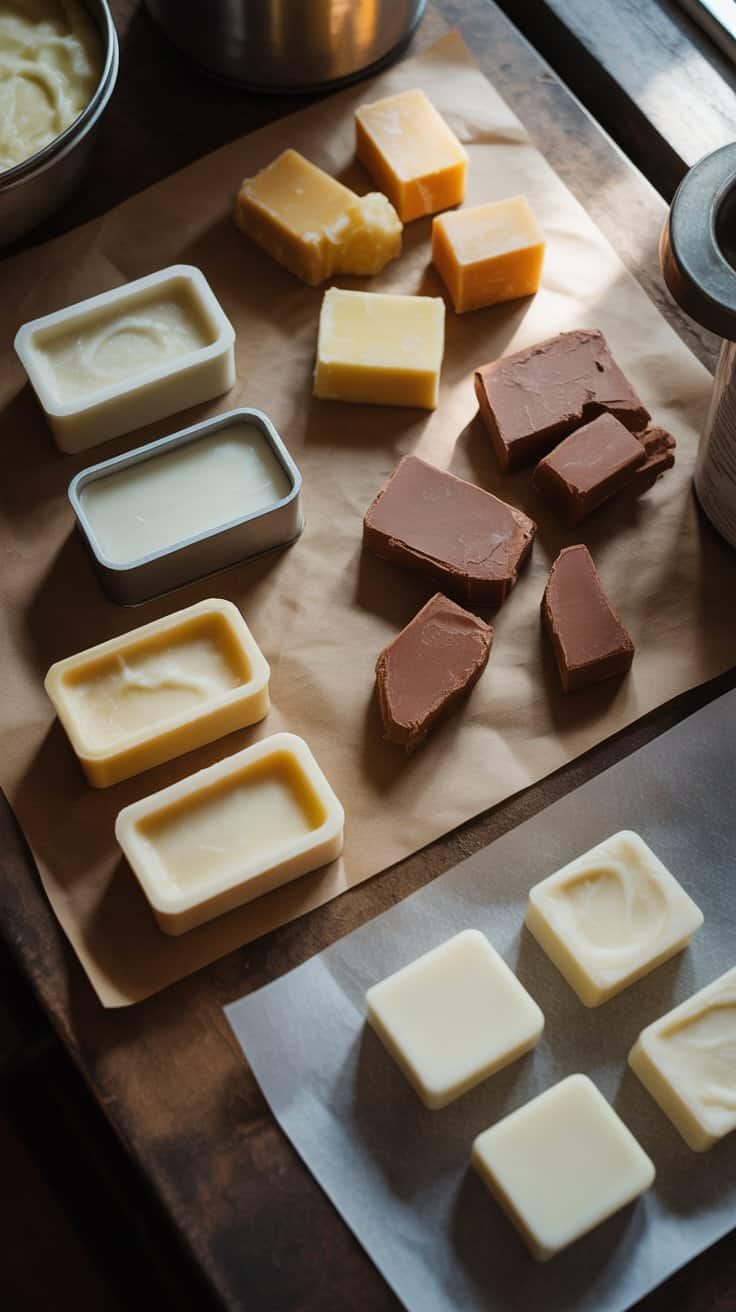
Lotion bars are solid moisturizers made from beeswax, cocoa butter, and oil. Melt everything together, pour into silicone molds, and let them cool.
Wrap each bar in parchment paper or slide them into small tins for a clean finish.
They’re long-lasting, mess-free, and a great plastic-free alternative to bottled lotion.
How to Make It
- Melt beeswax, cocoa butter, and a carrier oil together.
- Stir until the mixture is smooth.
- Pour into silicone molds.
- Let them cool until solid.
- Wrap or package once they are fully set.
Shopping List
- Beeswax
- Cocoa Butter
- Carrier Oil
- Silicone Molds
- Tins or Parchment Sheets
Tips to Make It Go Smoothly
- Keep the ratio of beeswax higher for a firmer bar.
- Use soft scents that feel comforting in winter.
- Let bars cool naturally for a smooth finish.
- Wrap each bar tightly to prevent oils from escaping.
- Store finished bars in a cool space to maintain shape.
Kitchen & Edible Crafts
Winter food crafts are comforting to make and easy to sell as gifts. They bring warmth to the kitchen and look beautiful when packaged with care.
21. Hot Cocoa Jars
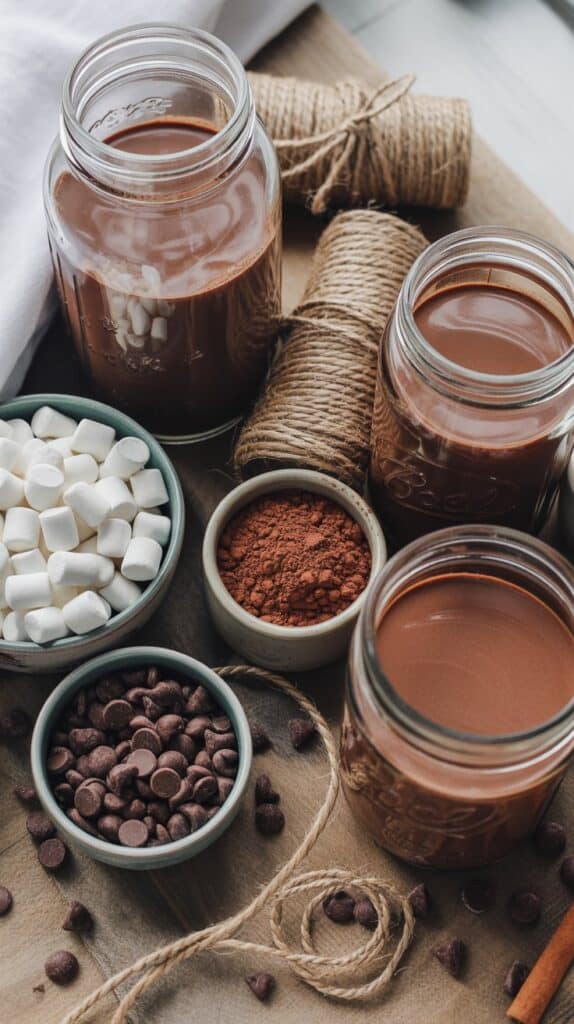
Hot cocoa jars are a classic winter seller. Layer cocoa powder, sugar, and mini marshmallows in glass jars for a cozy, ready-to-gift mix.
Add a small tag with directions and a handwritten note for charm.
They look lovely on holiday tables and are quick to batch-make for markets.
How to Make It
- Layer cocoa powder, sugar, and powdered milk into glass jars.
- Add mini marshmallows or chocolate chips on top.
- Seal the jar tightly.
- Tie a simple tag with serving instructions.
- Package individually or in small sets.
Shopping List
- Glass Jars
- Cocoa Powder
- Sugar
- Powdered Milk
- Mini Marshmallows
Tips to Make It Go Smoothly
- Use a funnel to keep layers clean and defined.
- Keep jars dry so ingredients stay fresh.
- Stick with simple flavors for wider appeal.
- Add a ribbon or twine tie for a cozy finish.
- Photograph jars in natural light to capture the layers.
22. Spiced Sugar or Salt Blends
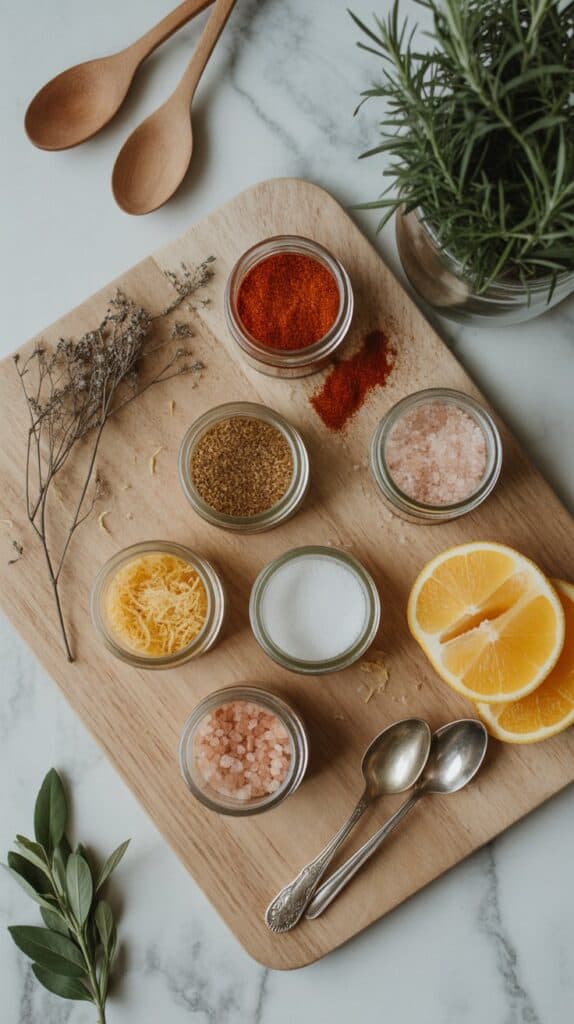
Infused sugars and salts are simple but feel special. Mix sugar with cinnamon, vanilla bean, or orange zest, or blend salt with herbs and dried garlic.
Spoon into small jars and label them for easy gifting.
They are affordable to make and last a long time, making them great for winter foodies.
How to Make It
- Mix sugar or salt with your chosen spices.
- Stir until everything is evenly blended.
- Spoon into clean jars.
- Add labels with uses and ingredients.
- Seal and package for gifting or selling.
Shopping List
- Sugar or Sea Salt
- Cinnamon, Vanilla Bean, or Herb Blends
- Small Glass Jars
- Labels
- Measuring Spoons
Tips to Make It Go Smoothly
- Use dried ingredients to prevent clumping.
- Keep blends simple so they pair with many recipes.
- Label clearly so buyers know how to use them.
- Package in small jars for easy gifting.
- Offer a sweet and a savory blend for more variety.
23. Simmer Pot Mixes
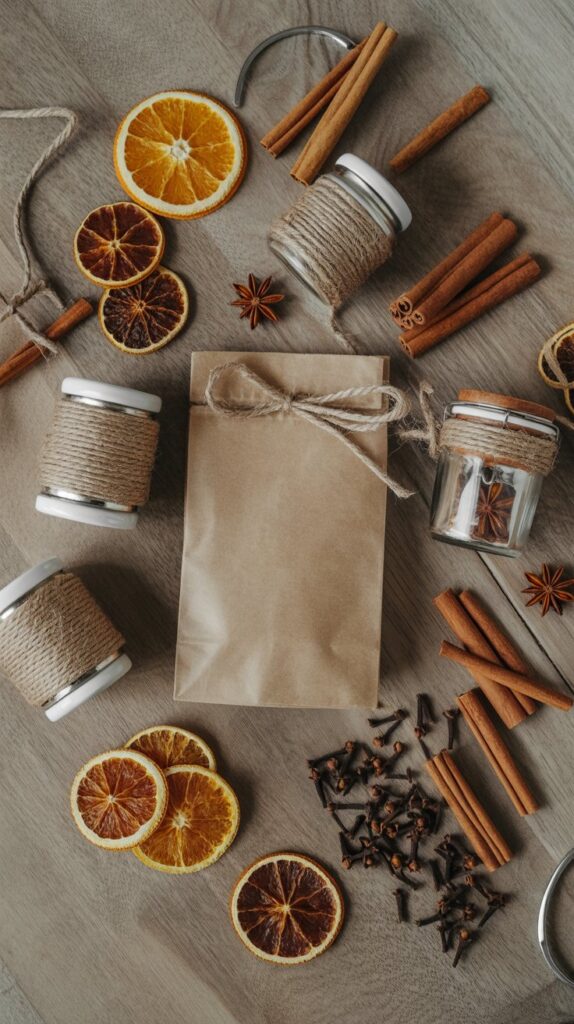
Simmer pot mixes bring cozy scents into a home without chemicals or sprays. Combine dried oranges, cinnamon sticks, cloves, and star anise in a small bag or jar.
Add a tag that says “simmer with water for holiday fragrance.”
These are low-cost to make and sell beautifully at winter fairs.
How to Make It
- Dry orange slices or use pre dried ones.
- Combine cinnamon sticks, cloves, and star anise.
- Layer everything into jars or kraft bags.
- Add a simple tag with simmering instructions.
- Bundle sets for winter markets.
Shopping List
- Dried Oranges
- Cinnamon Sticks
- Whole Cloves
- Star Anise
- Jars or Kraft Bags
Tips to Make It Go Smoothly
- Mix colors and textures for a pretty finish.
- Keep ingredients whole so the mix lasts longer.
- Use clear jars if you want the look to stand out.
- Add a handwritten tag for charm.
- Store mixes in a cool, dry place.
24. Homemade Vanilla Extract
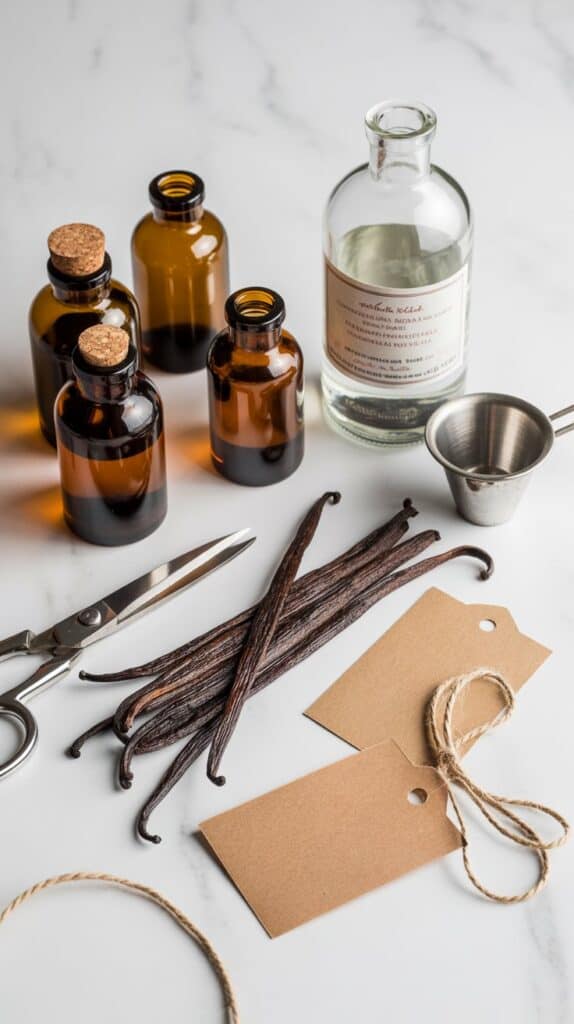
Homemade vanilla extract feels like a luxury but is incredibly simple. Fill small glass bottles with vodka and add a few split vanilla beans.
Seal tightly and store for at least a month before selling or gifting.
It is slow to make but adds a premium item to your winter craft lineup.
How to Make It
- Split vanilla beans lengthwise.
- Place them in small glass bottles.
- Fill with vodka until the beans are fully covered.
- Seal and store in a dark place.
- Let the extract steep for at least a month.
Shopping List
- Vanilla Beans
- Small Glass Bottles
- Vodka
- Funnel
- Labels
Tips to Make It Go Smoothly
- Use high-quality beans for the best flavor.
- Make batches early, so they have time to steep.
- Shake the bottles gently once a week.
- Add simple labels with a “ready by” date.
- Store bottles away from sunlight.
Eco-Friendly & Upcycled Crafts
Eco-friendly crafts appeal to shoppers who want something beautiful and sustainable. These projects give new life to old materials while keeping waste to a minimum.
25. Sweater Mittens

Old sweaters can easily become soft, warm mittens. Trace your hand on the fabric, cut two pieces for each mitten, and sew them together inside out before turning them right side out.
Wool or fleece sweaters work best. Add a small button or patch for a handmade touch.
They feel rustic and cozy and can be sold individually or in small sets.
How to Make It
- Trace your hand on the sweater and cut two matching pieces.
- Flip pieces inside out and pin them together.
- Sew around the edges, leaving the wrist open.
- Turn the mitten right side out.
- Add a small patch or button if you want extra charm.
Shopping List
- Old Sweaters
- Fabric Scissors
- Pins
- Sewing Machine or Needle and Thread
- Buttons or Patches
Tips to Make It Go Smoothly
- Choose thick knits so the mittens stay warm.
- Check for stretch before cutting so the shape fits well.
- Cut both layers together to keep the size even.
- Keep seams tight so rice or stuffing does not escape if you add lining.
- Package mittens with a simple kraft tag for a handmade finish.
26. Reusable Gift Wrap Sets

Reusable wraps are a thoughtful alternative to paper. Use fabric squares, ribbons, or cloth ties to create simple furoshiki-style wrapping sets.
Choose neutral or seasonal patterns that can be reused all year.
They look elegant, photograph well, and appeal to anyone who wants a low-waste holiday season.
How to Make It
- Cut fabric squares in several sizes.
- Hem the edges or use pinking shears to prevent fraying.
- Pair wraps with soft ribbon or fabric ties.
- Fold each wrap neatly and tie into sets.
- Add a small card explaining how to use them.
Shopping List
- Cotton or Linen Fabric
- Fabric Scissors or Pinking Shears
- Sewing Machine (Optional)
- Ribbon or Fabric Strips
- Small Instruction Cards
Tips to Make It Go Smoothly
- Use fabrics with a little structure for easier tying.
- Stick with neutrals or subtle winter patterns.
- Offer multiple sizes for variety.
- Keep folds tidy for clean packaging.
- Photograph wraps with a simple gift inside to show how they look.
27. Beeswax Food Wraps
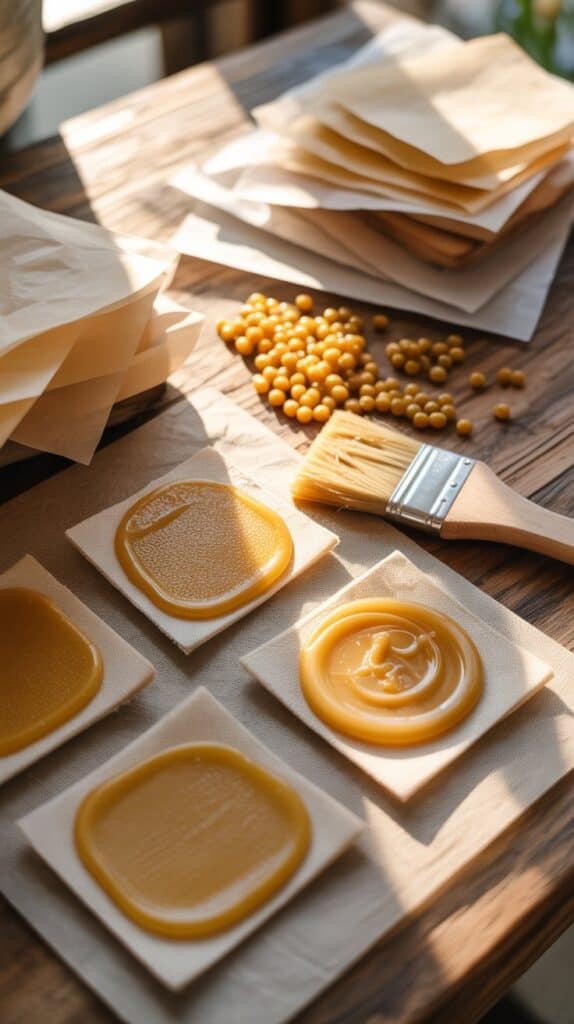
Beeswax wraps are useful and surprisingly easy to make. Brush melted beeswax onto cotton fabric, then let it cool until it stiffens slightly.
Trim the edges and stack a few wraps together with a paper band or tag.
They make practical gifts and sell well with eco-conscious shoppers.
How to Make It
- Cut cotton fabric into squares or rectangles.
- Melt beeswax in a double boiler.
- Brush melted wax onto the fabric until coated.
- Let the wrap dry on parchment paper.
- Trim edges and fold into sets.
Shopping List
- Cotton Fabric
- Beeswax Pellets
- Parchment Paper
- Paintbrush
- Rotary Cutter or Scissors
Tips to Make It Go Smoothly
- Use thin, tightly woven cotton for the best results.
- Keep the wax layers light so the wraps stay flexible.
- Even out thick spots by reheating in the oven for a few minutes.
- Choose simple patterns that match kitchen décor.
- Add care instructions to each set.
28. Tin Can Planters
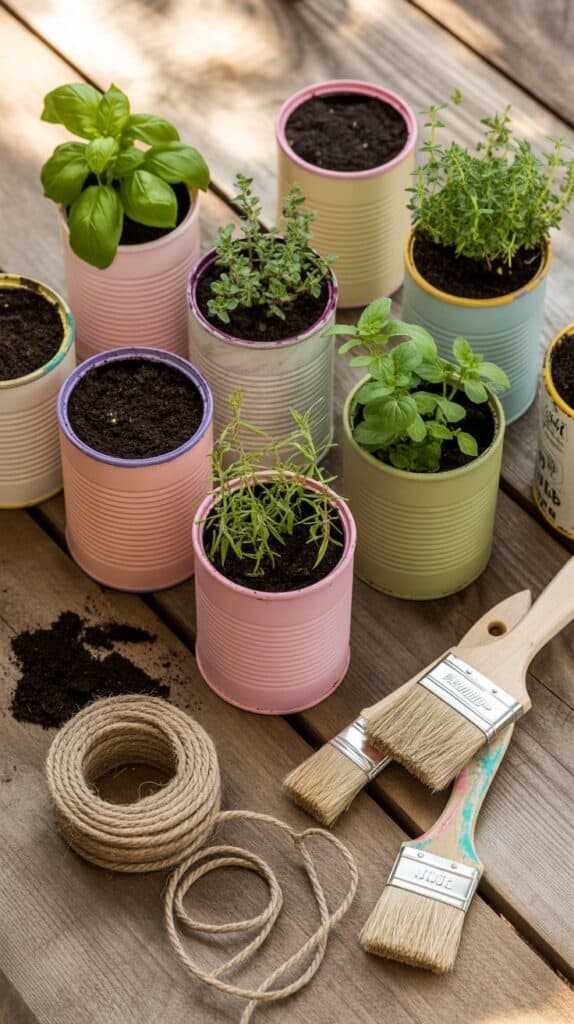
Save clean tin cans and give them a quick update with paint or fabric. Add drainage holes and small plants or herbs for a simple handmade planter.
They are great for kitchen windowsills or small gifts.
This is a creative way to upcycle while adding a bit of green to the winter months.
How to Make It
- Clean cans thoroughly and remove any labels.
- Paint the outside or wrap it with fabric or twine.
- Add drainage holes if you plan to plant directly inside.
- Fill with soil and add a small plant.
- Finish with a simple tag or ribbon.
Shopping List
- Empty Tin Cans
- Craft Paint or Fabric
- Twine
- Small Plants or Herbs
- Soil and Plant Tags
Tips to Make It Go Smoothly
- Choose cans without sharp edges.
- Use spray primer if you want paint to stick better.
- Mix sizes for a cozy, mismatched look.
- Keep plant choices simple and hardy.
- Photograph planters in natural light to show colors clearly.
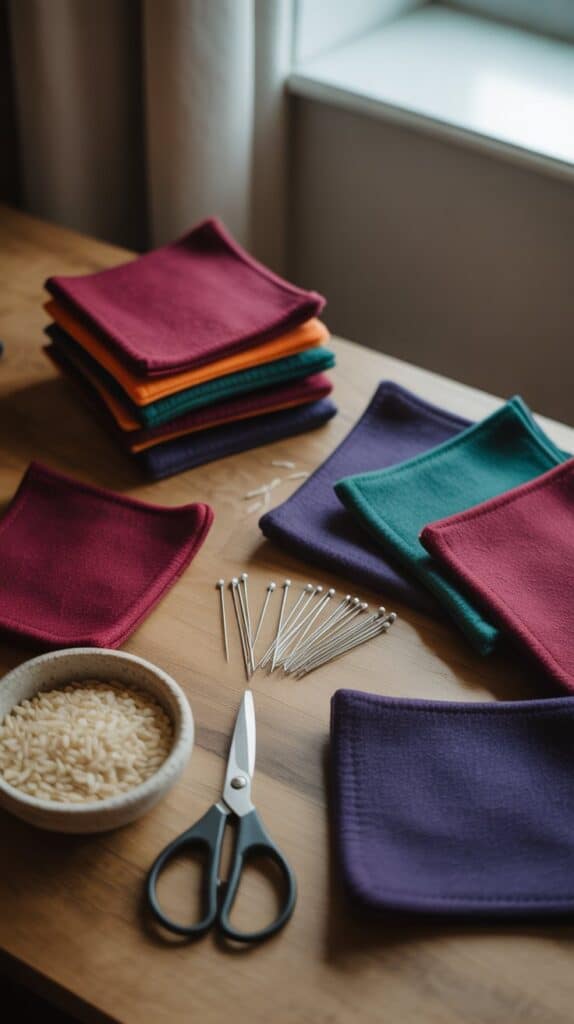
29. Felt Coasters
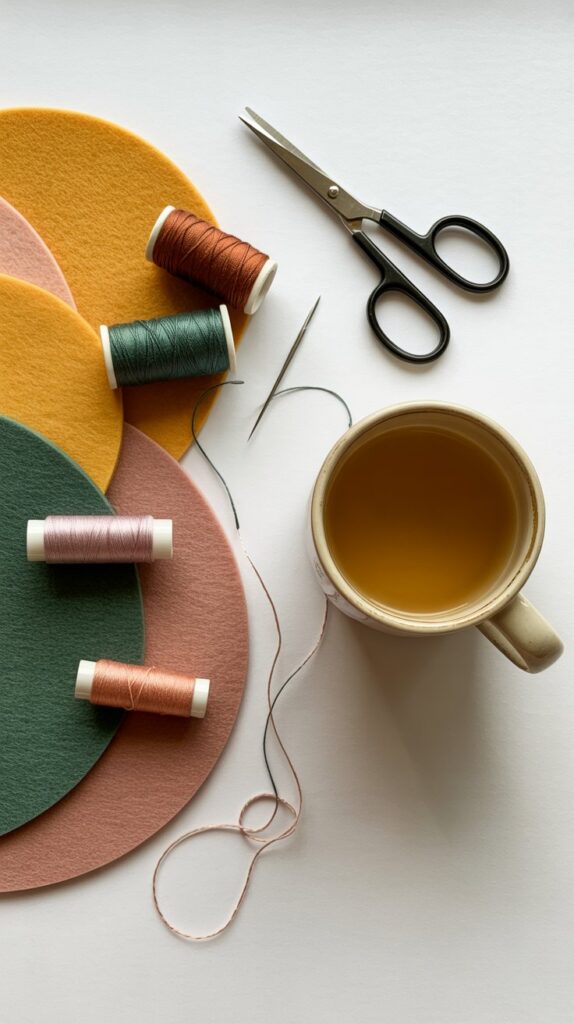
Felt coasters are simple, soft, and easy to customize. You can cut them into circles, squares, or small winter shapes and stitch the edges for a clean finish.
They are light, durable, and appealing to shoppers who want something cozy without too much fuss.
These coasters make sweet winter gifts and pair well with mugs, tea blends, or candle sets, which helps if you are bundling items for markets.
How to Make It
- Cut felt into your chosen shape using a template or stencil.
- Layer two pieces together for extra thickness.
- Sew around the edges with a simple running stitch.
- Trim edges neatly once the stitching is done.
- Bundle coasters in sets for gifting.
Shopping List
- Felt Sheets
- Fabric Scissors
- Needles or Sewing Machine
- Thread
- Coaster Templates
Tips to Make It Go Smoothly
- Use thicker felt so the coasters hold their shape.
- Keep stitches even for a clean finish.
- Stick with soft winter colors like cream, charcoal, or muted blue.
- Test coaster size with a mug for accuracy.
- Photograph coasters with a warm drink for added appeal.
30. Mason Jar Cookie Mixes
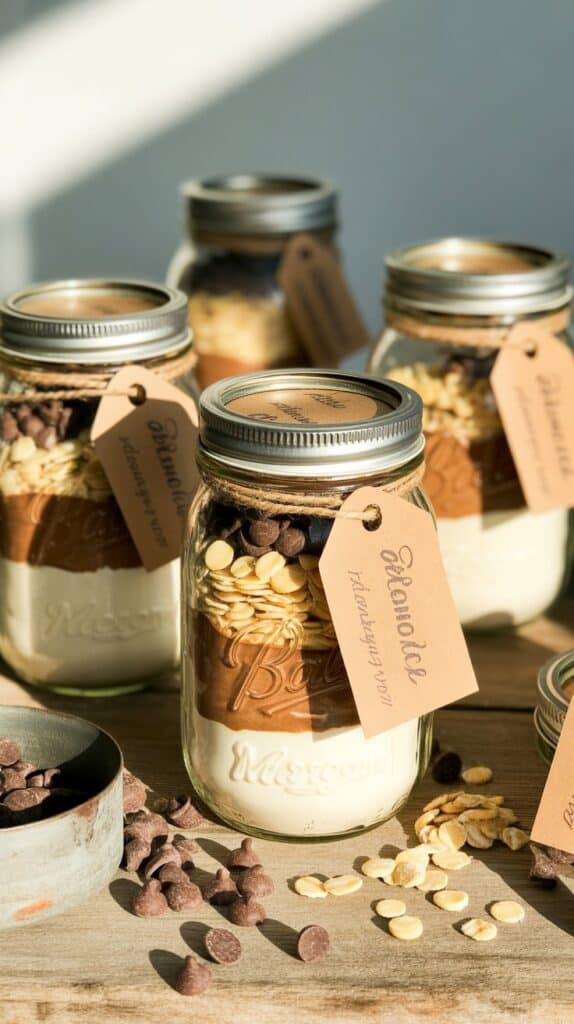
Mason jar cookie mixes are a classic winter favorite. The layered ingredients look beautiful in clear jars and make baking easy for the person receiving them.
You can choose any recipe you like and add a simple tag with baking instructions tied around the lid.
They are budget friendly, quick to assemble, and perfect for shoppers looking for thoughtful, ready to bake gifts during the holiday season.
How to Make It
- Layer dry ingredients into a mason jar in the order listed in your recipe.
- Pack each layer down gently to keep the stripes clean.
- Seal the jar tightly once filled.
- Add a handwritten or printed tag with instructions.
- Tie with ribbon or twine for a cozy finish.
Shopping List
- Mason Jars
- Cookie Ingredients
- Measuring Cups
- Twine or Ribbon
- Instruction Tags
Tips to Make It Go Smoothly
- Choose recipes with dry ingredients only.
- Use a funnel to keep layers tidy.
- Keep jars upright during storage and transport.
- Write clear baking steps on the tag.
- Add chocolate chips or crushed candy canes for a festive touch.
31. Upcycled Sweater Pumpkins
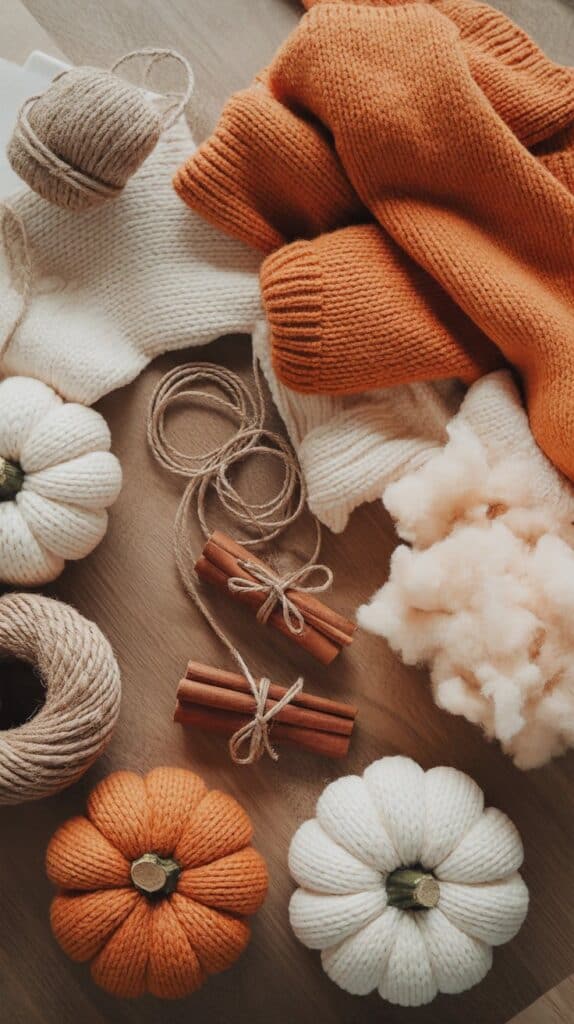
Upcycled sweater pumpkins bring soft, rustic charm to winter décor. Cut old sweaters into panels and gather them around stuffing before adding a stem made from a stick or cinnamon bundle.
They look beautiful on shelves, tables, and mantels and offer a cozy farmhouse feel without much effort.
These pumpkins are a gentle way to reuse old materials while creating something warm and comforting for winter decorating.
How to Make It
- Cut sweater sleeves or panels into wide strips.
- Sew the fabric into a tube and gather one end closed.
- Stuff with fiberfill until the shape feels full.
- Gather the top and secure it tightly.
- Insert a stick, cinnamon bundle, or faux stem.
Shopping List
- Old Sweaters
- Fiberfill Stuffing
- Needle and Thread
- Sticks or Cinnamon Sticks
- Twine
Tips to Make It Go Smoothly
- Choose thick, tight knits so the pumpkin holds its shape.
- Do not overstuff or the top may be hard to close.
- Keep stitches strong so seams do not pull.
- Add twine around the body for extra dimension.
- Display pumpkins in small clusters for a cozy effect.
Quick Tips for Selling
Selling winter crafts does not need to feel overwhelming. Start small and choose the items you enjoy making most.
Photograph your crafts in natural light and keep backgrounds simple. A wooden table, soft fabric, or a plain wall helps your work stand out.
Price your items with care. Include your materials, time, and packaging so you are not working at a loss. Small details like handwritten tags or simple wrapping add value without much cost.
If you are selling online, keep your listings consistent so your shop feels calm and cohesive. If you are selling at a market, group similar items together and use gentle lighting to create a warm display.
People love handmade because it feels personal. Let that shine through in your packaging and your product descriptions.
Winter Crafts You Can Make and Sell
Winter is a good season for slowing down and making things with your hands. Each craft on this list is simple enough to start with and thoughtful enough to sell or gift.
Pick one idea that feels right for you. Try it out, learn what you like, and let yourself enjoy the process. Small creative moments like these can make the colder months feel softer.
Handmade work carries a quiet kind of warmth. Sharing it with others brings that warmth forward, one piece at a time.

